Corset Making Supplies

Corset Making Supplies
A corset can be worn in any way you imagine

Tuesday, December 12, 2017

2018 Means 20 Years in Business

20 years ago this month I was stocking shelves and getting everything ready to launch Farthingales on-line costume and corset supply store in January. I wasn't thinking about 20 years ahead and really just intended to sell to theatres and and costume makers across Canada. At that time there was me and only me and there were a lot of hats to wear in order to cover all the bases.

Many people didn't have computers in their homes yet and Farthingales was the first company on the internet selling corset making supplies. Technology has grown at an incredible rate and we sell way beyond the borders of Canada and to a much more diverse clientele than I imagined possible.

What does our being in business for 20 years mean for you?


On the 20th day of every month throughout the year of 2018 
there will be a SALE posted on Facebook 
20% off for one day only.

Be sure to follow us on Facebook 
so you don't miss the sales


Wednesday, May 31, 2017

Armor from Fosshape and Woven Boning Part Two


The Fosshape Layer


The cage is ready for the draping of Fosshape over it. I folded the Fosshape around the outer edges of the cage. The Fosshape will stick to itself, but not to the woven boning, so I made sure there was enough extra to extend beyond the boning on the inside so that the outer edges of boning are encased in Fosshape and it is securely fused to itself.
I didn’t, but you’ll want to cover the corset/dress-form with plastic wrap to keep the moisture/steam from damaging them. I was lucky and no damage occurred but it was a risk.

I steamed the whole of the Fosshape armor, wearing my gloves to allow me to handle the Fosshape as I steamed it. Handling the Fosshape around the edges was especially important as I was able to squeeze the two layers together so they would fuse. The Fosshape does shrink as it is steamed  and I was able to guide the shrinkage as well as secure the seams by handling the Fosshape. I could not have done it without the gloves! The images below have no pins and while it looks like the armor may be stuck to the corset, it’s not. The armor does fit the shape of the corset but the Fosshape only sticks to itself.
Here you can see the inside of the shoulder structure with the woven boning


I marked the outline of the front bottom and back onto the Fosshape while it was still on the dress-form and then removed it and using scissors, cut along the line. If I do this again I think I’d add a second layer of Fosshape to these edges before steaming (much like I’d add a facing to a sewn garment) to give added strength to the edges.

I didn’t think about this “facing” idea soon enough so I tried to add it after and had limited success. I cut a facing in a similar shape and pinned it to the armor. I pinned it to the outside to make a design feature of it. When I steamed it the second layer did not shrink in quite the same way as the first layer had, so I had to recut the front edge. Had I fused the two layers during the original steaming my front shape would have been cut through two layers. Next time I will also pin from the wrong side so that the marks left by the pin heads, as the Fosshape shrank around them, will not be visible on the outside, as they are on this armor.


Decoration - The Leaves

The armor looked a little dull so I decided to make some leaves and add them to the armor…it’s the great thing about doing things yourself…you can make it up as you go!
I cut a few leaves from some scrap Fosshape 600 that I had (Fosshape 600 is thicker than Fosshape 300). I stitched a few veins in each and then pinned them onto the armor. I also decided to add a collar, I just cut a strip of the Fosshape 600 and trimmed it after I pinned it in place.

As I steamed the leaves and used my gloved fingers to press them carefully against the armor, they shrank and they fused to the armor. I was able to shape them as I steamed them, so they did not end up laying flat. I was also able to roll the collar back toward the shoulder.

I’m relatively happy with how my armor has turned out, especially as this is my first attempt at building a cage/aperture like this and covering it.
I still have several things to do before this is finished; I have to paint it and I have to determine how it will be worn – will I attach it to a corset? Will I create a belt of some sort to connect the center front with the center back? I’m not sure yet.
The painting is in my future...I'm still holding out to find the right colours. I have silver and matte black to make a tarnish metal look but am hoping to find a better selection of colours when I get to a bigger city.
I had created this article in a Word File where I had total control of format and image tweaking but I found no way to bring the whole file into this blog and had to start all over. Neither the images or formatting are what they were and while it's very disappointing - at least the information is here.

The Fosshape has been shaped and hardened with steam to get this semi-final look
I used two shades of gold spray paint and painted both the corset and the armor to create a complete look. Now to determine what skirt or pants to make!


Tuesday, May 30, 2017

Armor from Fosshape and Woven Boning


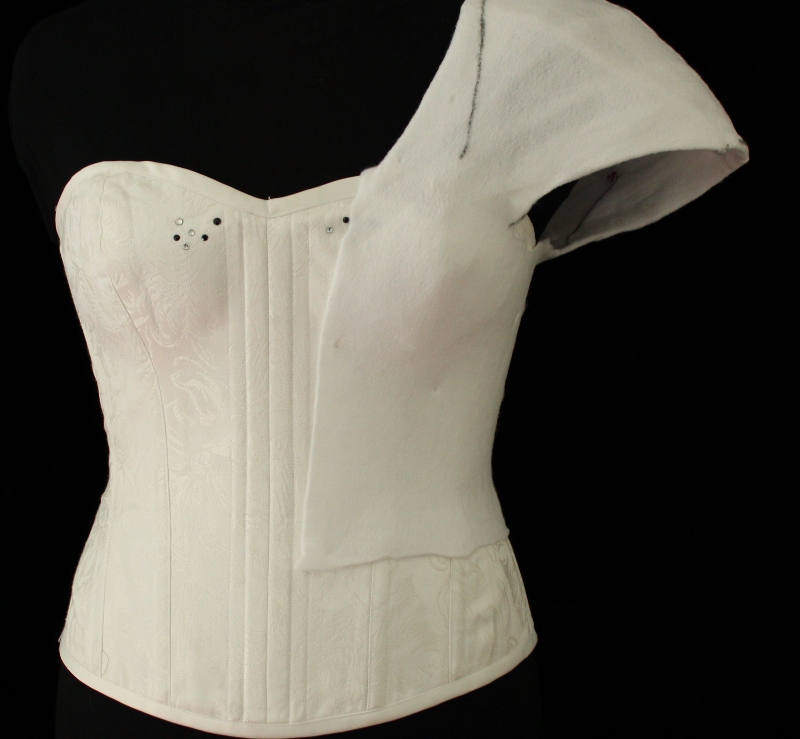
This article will outline how I used woven boning and Fosshape to create an armor look. The end result is not strong enough to be armor, it is light weight and rigid enough to hold the shape but not rigid enough to withstand any impact. I’m creating a “woven bone” aperture and then draping Fosshape over it to create the outer surface. FYI this is my first attempt doing anything like this.


The “armor” that I made is a single shoulder shield, decorated with leaves. My plan is that it will be the colour of oxidized copper “verdigris” but at this point I’ve not found paint options (in my town) that will allow me to get this look. I may have to settle with tarnished silver.
The armor is shown above on black dress-form, against a black backdrop. I’ve put a white corset on the dress-form so that you can see how the armor will sit, although it is not hugging the waist in this image and it is sitting well above the shoulder of the dress-form, which it is supposed to do.
I used Fosshape 300 (the lighter weight version) as that is what I had, and I used 10mm wide white woven boning (Product Code: 15-8110-01, found in the notions section) and the rubbery tips. All items were from Farthingales.
Woven boning is like “Rigelene” was. There are long narrow hard strips woven together with thread. You can sew through it and when you cut the ends they fray and can be prickly; hence the need for tips.

The Tools
I used:
Scissors, extra long yellow head pins, a marking pen, pliers (you’ll need them to pull the needle through the woven boning) and a thimble - yes, you absolutely need a thimble! A leather needle, buttonhole thread and glue.

These are not my good fabric scissors! Not just any needle will do, an ordinary “sharp” will break when going through the woven boning. I used a Leather Needle. The thread is not ordinary thread, you need heavier thread. I chose red so it will be easily seen in this sample. The glue I used is “Jewel Glue” by Unique as it’s what I had available.
Gloves help protect your hands from heat. I got these in the garden section of a “Dollar Store”. The white are gave no protection! An oven protective sheet helps to.
If you have a heat set press for setting heat set crystals you may use the sheets that are used with it. Some form of heat it required to set the Fosshape, I use and inexpensive steamer and I used a tradtional iron too. Last but not least I used a dress-form to “drape” my project on and I picked up spray paint from my local hardware store where the only option was automotive spray paint. I chose silver and matte black…though I’m holding out for other options.

Woven Boning Aperture

The woven boning comes on a coil and unlike steel, woven boning will retain the curves of the coil when you unpack it.
To straighten the woven boning I pressed it between a Teflon sheet and the Teflon coated ironing board cover with my iron at “silk” setting. I pressed a few meters at a time.
I draped a length of the woven boning on the dress-form to get an idea of the length of pieces I would need and then I cut 4 pieces to that length. I slid a rubbery tip onto the cut ends and then began to pin them to the dresform to create the desired shape. The images below show a woven bone with a rubbery tip applied to the end and the shoulder of the dress-form with the woven boning pinned in place.


Pinning the woven boning in place takes some “playing around” to get the shape you want and structural soundness (which you get when bones cross each other and can be secured together). The dress-form I’m using is a “Uniquely You” one and it is made of foam, so I can stick pins directly into it. This ability made this step of the project easy. I also pinned every intersection of the  bones, by just sticking the pins straight through. The yellow heads make them easy to see and to handle. I continued to pin pieces in place to create the shape I wanted and the structure needed to support that shape. Note that I've pinned directly to the dress-form as well as pinning the boning together at each intersection.
  
This process takes time. You may place and adjust the boning several times until you are satisfied with the shape and the stability of the structure.
I love these yellow head pins because they are easy to see, easy to remove, strong enough to go through a few bones and long enough to go into the dress-form when I need them to. Once all the pieces were where I wanted them (this was determined by the shape and how stable the structure had become) I added two short pieces of woven boning at the back and front where all the pieces converged.

When all the pieces were pinned in place it was time to start hand sewing the intersecting points. Basic needle and thread cannot be used as the needles break and the thread frays. A leather needle works well and heavy duty thread doubled, makes the job go more quickly, but it is still time consuming!


There were times when I needed to use needle nose pliers to grip the needle and pull it all the way through two or three layers of boning.
When I got to a point where I needed to remove the “cage” from the the dress-form in order to complete the sewing I made sure I still had pins at every intersection of boning that had not been sewn yet.
I remove the cage from the dress-form and stitched the intersections where they are pinned, being careful as I worked around the pin points – it was a bit awkward.
After all the intersections were stitched, I added a dab of glue over the threads on the inside of the cage to secure them. To be honest, I cheated and gluded some of the intersections without having stitched them (but I don’t recommend skipping the stitching). I used a piece of the boning and dipped it in the glue, then slide the glue between the two intersecting bones (not removing the pin) and used a paper clip to add extra pressure at the contact point until the glue dried.
I finally decided which corset I’m going to use as a foundation for this shoulder armor and I placed it on the dress-form and set the cage in place. It would be best to determine this first…unless like me, you are just experimenting.


This is all for today, perhaps the computer it tired or maybe it's me. No matter what I do and formatting has been a nightmare. I will attempt to blog about how I used Fosshape 300 to cover the aperture and create a base, on another day...if I don't toss my computer out the window first!  All images show up perfectly in the back end...but not on the blog post, so I can't see how to fix them.


You can find out more about Fosshape by clicking the link below

And you can find out more about Woven Bones (Rigelene) by clicking


Friday, May 19, 2017

Fosshape; My First Experience

My First Fosshape Project

  • Fosshape is a felt like product that is sold by the meter, just like fabric. It's available in two weights #300 and #600, 300 is about 4mm thick so it's thinner than 600 which is about 6.5mm.
  • Like felt, Fosshape is a nonwoven but unlike felt it hardens when you apply heat from a steamer or heat gun. I found the steamer worked best for me as it was easier to control.
  • You can sew Fosshape pieces together and then heat the finished shape to harden it...but it does shrink a bit. It's also easy to cut with scissors
  • You can paint or dye Fosshape, I've not done either yet but will soon - so visit this blog again next week.
  • This stuff seems to be pretty versatile with few limitations but I've never worked with this type of product before...so, what do I know!
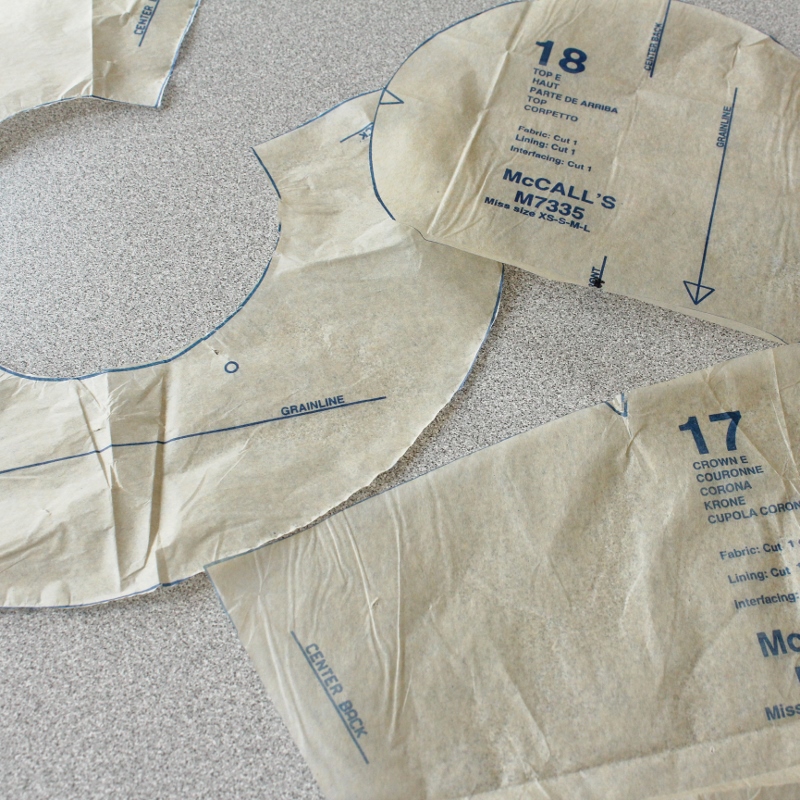
While I have played a bit with Fosshape, I haven't attempted to really make anything from it until now. I had a McCall's pattern 7335 for some hats and decided to make a small top hat, one that will attach to a head band and perch on top of my head, not a real style top hat.

I cut the 3 pattern pieces out and pinned them to Fosshape 600

I then sewed the pieces together as instructed in the pattern instructions, except the seam of the brim and the seam going up from the brim. I overlapped these seams (having drawn the seam allowance on to indicate where the overlap should be) because I was concerned about the bulkiness. You can see the lines that I drew on, in the image below.
Once the pieces were sewn together (I used a long machine basting stitch), I steamed the whole hat and shaped the brim to turn up on one side. I plan on picking up some oven gloves that allow dexterity as I did find the steam got a bit hot. The Fosshape was never too hot to handle but my fingers got exposed to the hot steam. So be very careful.


The process took surprising little time, maybe about an hour! The hat is not finished as I'm trying to decide what I want the final colour to be. I think I may spray paint it black and use some interesting ribbons and feathers to decorate it.

This product is good for many things, including masks and body armor.

The following link will take you to the Farthingales website and their selection of
Fosshape and Wonderflex. 


Monday, February 6, 2017

Downloadable Corset Pattern

Farthingales has created an easy corset pattern that can be purchased and down-loaded along with instructions. There's also a video to guide you through corset pattern alterations!

This super easy corset pattern has only 4 pattern pieces; eight pieces in total - 4 for each side of the body. With so few seams to sew, this corset is fairly quick to make even for those who have never made a corset before. So, if you're wanting to make your first corset, give this a try.

This is a waist cincher corset pattern and it's a great option for those who want to make a corset but have no or little experience.

Linda Sparks used this pattern for her Craftsy Class "Custom Corsets: Bones, Casings and Busks" to make the waist cincher corset in the class.

This pattern was also used for these corsets.
 

Here's a link to the video on "How to Alter a Corset Pattern"

To get the corset pattern, check out the Farthingales Corset Pattern Page the down-loadable corset patterns are at the bottom. You'll need to know your waist measurement in order to choose your size; there are a few sizes to each pattern down-load.

Corset making is not that hard when you have the right tools and take it step by step. It is a learning process and knowing how to sew a straight line really helps but if you can't sew a straight line - don't worry you can still make a corset ...you have to start somewhere!


Thursday, January 19, 2017

My Corset Making History

It was 1987...a rather long time ago...over half of my life ago! I was working as a junior costume maker at Canada's largest costume shop and they offered and "off season" class in corset making. I was looking to expend my skills but really didn't know much about corsets at all, and signed up for the class.
The teacher was an older woman, at least I thought she was, now I realize she was likely only a few years older than I am now! She was originally from Holland I think and had a delightful sense of humor as well as skill both as a corset maker and teacher.

We didn't learn to draft a pattern and we didn't get to make corsets that fit us, nor did we get to keep the corsets we made - they were added to the theatres stock but we all loved the process and had a great week. I still have a picture of us on the last day with our finished corsets. If I can find it I'll scan it and post it (it was taken in the days of film). We did each get to choose the fashion fabric we wanted to use from a selection that was provided and we di get to try the corsets on when we were done - despite them not being our size. I was captivated by the process and when I tried on the finished corset I was hooks; who knew I could look like that!

There were few opportunities to meet corsets in the costuming future, but I did make corset type bodices for various productions such as the North American premiere of the Phantom of the Opera and other lesser plays.

Once children arrived in my life, I left costume production and focused on running my own company "Farthingales" in 1998. The hours were better and more flexible and I was able to focus more on the things that I wanted to do, while still making a living.  Farthingales was one of the very first companies online selling costume and corset making supplies.  I did my research on developing the company at the local library, because like everyone else I knew, I did not own a computer. I started to make more corsets in order to understand how best to use the corset supplies I want to sell and promote.  In reality it was an excuse, I really just wanted to explore corset making techniques and how to refine the process and make it faster, yet still end up the durable and supportive garment.


The teaching and learning led to my writing the book "The Basics of Corset Building" which is published by Macmillan press.  In a way I suppose writing the book was self-serving, as it meant I would no longer have to answer the hundreds of emails that came in asking many of the same questions.  I assumed when I wrote the book and when I taught basic classes, that people would use that information as a springboard to their own exploration of corset building.  In many cases this is in fact what happened but in many more, people wanted more knowledge.  I've continued to teach both basic corset making, and more specialized corset making classes at conferences and by invitation, but I've also tried to create a series of downloadable books that address specific corset making questions.  This series of books was written by the end of 2011 and sent off to the publisher as one book with 28 chapters. They were concerned about the in excess of 400 pages (alomost 500) and the salability of it.  They were not interested in making it into smaller booklets, so it was time to discover how to sell these books on my own.  They all chronicle a corset project or two that I have undertaken either on my own or with someone to help with sewing - while I photographed and wrote about the process.It wasn't long until I was sharing my knowledge both online and in classes throughout the US and Canada.  The more I taught, the more I learned.  When you teach, students ask questions that you haven't thought of, they asked questions that you know the answers to but  have long forgotten that you once asked to.

If you're not familiar with these downloadable books you can read more about them at

https://www.farthingalescorsetmakingsupplies.com/Corset-books-s/1977.htm

Not all the chapters are on-line yet, I get one up every couple of months and wish I had more time to work on them.


Wednesday, November 23, 2016

How to Finish the Ends of Corset Bones

Ever have difficulty finishing the cut end of steel bones?

This video may help and there are several other corset making themed videos on the Farthingales Channel.  Just click on the title of this post.

Tuesday, February 23, 2016


Truly Victorian TV141 - 1860 Round Cage Crinoline: Three Short Versions                   

Using the Truly Victorian round cage crinoline pattern we’ve created 3 contemporary versions of a cage. We’ve made all in size medium for a waist up to 39” (99cm) but have used different materials for each. Products used are listed below – if the product is sold at Farthingales the item # is included.         


Cage 1

o   6mm hoop steel #50-8406-06 (approximately 10 meters)

o   ½” wide white bone casing #34-7212-01 (approximately 10 meters)

o   1” (24mm) white Petersham for waistband and vertical ribbons #70-7625-01

o   Buckle #54-8730-34 (1)


Cage 2

o   10 mm hoop steel #50-8405-10

o   Hoop connectors #00-8400-11

o   no casings

o   1” pink Petersham for waistband and vertical ribbons

o   3 hoop connectors to close bottom three hoops #00-8400-11

o   Buckle #54-8730-34


Cage 3

o   11mm German plastic boning #50-8125-11

o   no casings

o   1” black petersham ribbons and waistband #70-7625-90

o   Buckle #54-8730-34

o   used a large denim needle in the machine

These are Victoria’s notes

            The process for each cage was more or less the same and I did follow the pattern instructions, with a few changes made to accommodate the different materials being used. Because I was making a short version of the cage, the “bag” for the four lowest hoops was not necessary.

  I began my cages with the waistband and ribbons, opting not to cut my hoop steel until I was closer to needing them. I used the guide provided to determine the length, however I chose to measure the guide rather than simply laying the ribbon along it, which is what the instructions seem to suggest. I also added the step of pressing all my ribbon before cutting my pieces, as well as pressing the fold of each ribbon before marking the stitching lines for the slots. This ensured that all my ribbon was sitting nice and flat as I was marking, so that all my marks would be accurate and in the same place on each ribbon. At this point, I didn't follow the pattern completely. The markings on the guide in the pattern give a 1” wide slot for the hoops while the pattern calls for 3/4” wide bone casings and 1/2” hoop steel and I thought all those numbers were a little more different that I cared for. Instead, I marked and stitched the top of each slot (as well as the waistband) then measured the width of my boning or casing and marked my second line according to that measurement. Regardless of how you do it, marking is a must.

            Side Story: The process of stitching all these very short lines is a bit tedious, there's no denying it. There is also no way around it. I had thought there might be when I made the third cage with the sew through boning (German Plastic), but I was wrong. I had thought that I could use only one layer of ribbon and simply mark where the boning had to sit on each ribbon and then sew the ribbon to the boning, however I was forgetting the part where you need to be able to adjust the position of each ribbon as you go. We'll get to it in a moment.


For the Judy I was using, this meant my spaces were between 2 1/2” and 3” wide. This differed a little between each of the three cages I made. On my first cage, I pinned each ribbon to the waistband and into the dummy and proceeded to insert the hoop steel, however on the second and third ones I felt pretty confident with my spacing and decided to go ahead and secure the ribbons to the waistband before inserting the hoop steel. I decided to secure my ribbons by hand by doing a small whip stitch around the open edges of the waistband slot, but this step could be done by machine. I simply preferred the look of having done it by hand. (I mention all this because I used the same Petersham for my waistband as I did for the ribbons instead of belting and wanted to add a little more detail about the process than the pattern gives.)


Note: there are little snowflakes sewn to the bottom of the ribbons for decoration.

            Here I once again skipped forward a bit. I made my waistband by stitching two 35” lengths of ribbon together along the outer edges, attaching a buckle to one end and finishing the other by hand (I did an adorable and easy-to-thread-through-the-buckle little point). I then threaded all my ribbons onto the waistband and fastened it around a Judy. Once on the Judy, I made sure that all the ribbons were evenly spaced on the waistband.     


   With ribbons on my waistband, it was time to get to the hoop steel and casings. I only used casings on my first cage and left the hoop steel exposed with the other two. The top two hoops of each cage are cut significantly shorter as they don’t go all the way around the body (providing an opening to get into the cage. I cut these hoops the length indicated by the pattern - for all three cages, which seemed to work just fine. The lengths of the lower hoops varied a bit between each cage, partially because they were all being finished in different ways. For the first cage with the 6mm hoop steel and casings, I cut my bottom two hoops 6” longer than stated in the pattern so that I would have a good overlap (because there are no “hoop connectors” to fit this size of hoop steel), which proved to be more than generous. I cut the lower three hoops of the second cage 4 3/4” shorter than indicated to remove the overlap allowed for in the pattern, as well as allow for the gap created by the hoop connectors. These hoops were still too long and I ended up cutting several inches off of each of them. For the third cage, I cut all five hoops the length indicated in the pattern and still ended up shortening the three lowest hoops by several inches each. In general, I suppose it's better to have hoops that are a bit long rather than too short. Had I been building the full cage crinoline this likely would not have been an issue.


            When threading the hoop steel into the ribbons, I always started at the top and moved down, but I don't think there's really any reason not to start at the bottom and work up if you wanted. This is where I discovered the necessity of the slots in the ribbons. I had hoped to omit then with the third cage. Basically, I would thread the hoop steel into the slots, then adjust the spacing of the ribbons along the hoop steel as necessary so that they were more or less (I did eyeball this bit) evenly spaced and the whole cage was taking on the shape I desired. Without that slot, there is nothing to hold the hoop steel in place while you insert the other hoops or make adjustments. So, it's a bit tedious, but the slots are necessary. 

            Once I was happy with the spacing and the shape of each cage, it was time to finish it. For the second two cages, this meant folding up the excess at the bottom of each ribbon and stitching it in place by hand so that it looked pretty. For the first cage, this meant hand stitching the bone casing to the ribbons at each slot. This was another tedious task and I would highly recommend that you don't forget your iPod at home. This step isn't absolutely necessary, as evidenced by the other two cages, however, it does mean that all that meticulously adjusted spacing won't get thrown out of whack when the wearer moves or sits. If the slots sit fairly tightly around the hoop steel, this shouldn't be a huge problem.  In the end, the only time I actually took advantage of being able to sew through the plastic boning was when closing up the lower hoops. I used a heavy needle in the machine, but still had some problems with the thread shearing. In the future I would use a heavier thread or even “Koban” when stitching through this boning. It is also a bit fiddley sewing through two layers of boning as the presser foot and the feed dogs aren't able to get the same grip on the plastic hoop as they can on fabric, and a firm hand is needed. I also ended up having to walk the needle through the first few stitches.

            My overall impression is that the pattern works and I was happy with the finished product. I did tend to find that the lower hoop steels were too long, but that is preferable to them being too short, and the instructions tended to be a bit brief, but they cover all the really necessary points. I do think that they could be laid out in a more logical order though, i.e. getting the waistband and the ribbons all constructed and put together before you start cutting hoop steel so as not to have unwieldy hoop steel floating around and getting in way longer than necessary. The pattern also makes no mention of using a Judy, which I think is perhaps the most important tool you have in the whole project. It made spacing my ribbons evenly and inserting the hoop steel very easy. It also allows an instant visual of how everything is sitting and where adjustments are needed.

            The German plastic boning is easier to work with as it is lighter, it can be sewn through, ends don't need to be tipped (at least not on this kind of project) and it can be cut with scissors. The finished cage was also a good deal lighter than the other two which could be more comfortable for an extended period of time, however it didn't hold the perfect circle as well as the steel boning and the cage was not as stiff as the other two. It might not hold its shape very well under a heavy skirt. You don't really need any particular tools to work with it, aside from a bigger needle, but the finished product might be a bit wobblier than you want it to be. The steel holds a beautiful shape and will feel overall like a sturdier garment, but it is tough to cut and you do need special cutters for it as well as tips for the ends.

The upper hoops are not complete hoops – they’re open at the front to allow easy entry into the cage and to allow fabric to lie more flatly over the stomach area.
The front ribbons have a slot sewn into them for the steel and the very front edge is sewn closed with hand stitching so that the hoop can’t protrude beyond the front ribbon.


Victoria used hoop connectors with the hoop steel to make the hoops easy to make and removable for easy storage.


o   Slide the cut end of the steel into one end of a hoop connector until it’s secure
o   Slide the hoop steel into the hoop casing, leading with the hoop connector as it has a rounded edge and should not catch
o   When the hoop connector comes out the other end of the hoop casing – slide it onto the back end of the hoop steel, until it’s secure
To remove the hoop from the garment, grip the hoop steel on either side of the hoop connector and pull.


Many thanks, to Victoria Bruer for her efforts on construction and notes of this method.

Even McCall’s suggests using these hoop connectors in their Costume Pattern #M7306


To find out more about hoop connectors click the link below